How to Activating and Programming DVRs, NVRs, and IP Cameras Through Web Browser
After the cabling and installation of the CCTV camera are done, you have to configure DVR or NVR for the first time. In Some cases, the client wants to monitor the CCTV cameras on the mobile or with a laptop. In this scenario, you have to program the camera with the help of a web browser. that's why we need to configure devices with a laptop or computer, Follow the below steps for configuration:
 |
Step 1: Getting IP address
With the help of an IP scanner or SADP tool by Hikvision you can easily get the IP address of the surveillance device.
The above IP address you got from SADP is the device IP address, in the following point depicts how to set the computer IP address to the same as the device address.
Step 2: Set the computer network
Set your computer IP address and gateway the same as the surveillance device IP address you got from the SADP tool.
How To change the IP address of any Computer click on this link.
How To change the IP address of any Computer click on this link.
Step 3: Open web browser
Open any web browser recommended (Internet Explorer), type the exact IP address you got from IP-scanner or SADP, and click enter. You have the Hikvision web interface for Activation of the device.
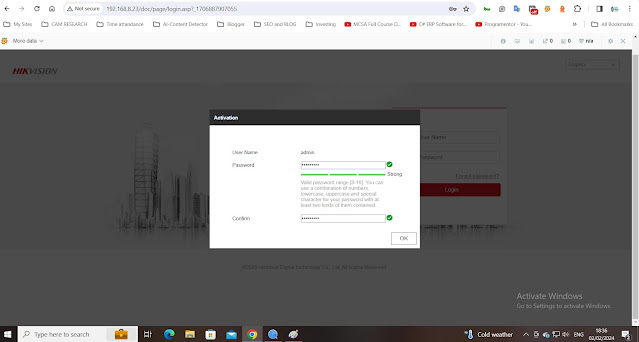
Step 4: Sign Up for the first time
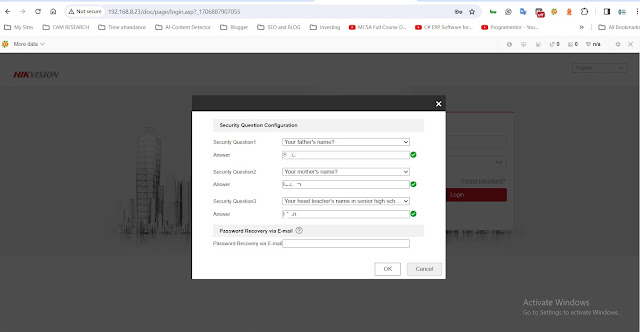
The first time, the device asks for the password two times and clicks ok, then the next window asks about 3 security questions, selects the question and gives the answer. Security questions were added by Hikvision to give one step more security and in the case of forgetting the password, you can easily reset with these 3 security answers.
Step 5: Set Date and Time
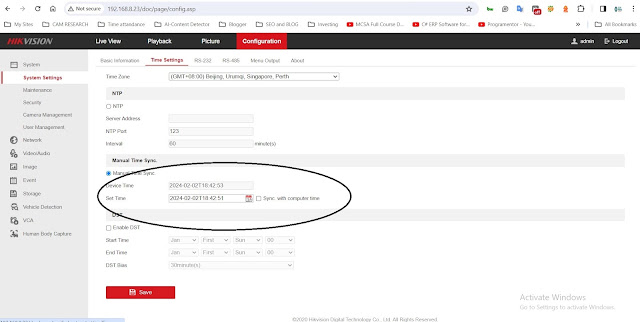
Select the time zone and set the time and date of the devices. This is a very crucial setting for any video recorder because it simplifies searching the video process and in the case of submitting the video to the authority it can be used as legal evidence.
For quick setting the time, you can select the check box Sync with computer time so DVR/NVR automatically sets the time, date and timezone of the computer.
For quick setting the time, you can select the check box Sync with computer time so DVR/NVR automatically sets the time, date and timezone of the computer.
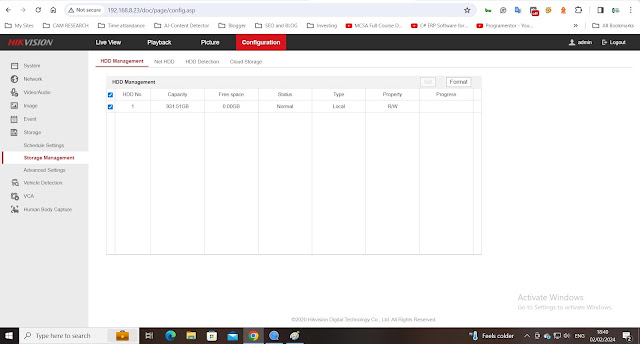
Step 6: Format the Hard Disk Drive
It is a very crucial stage because Hikvision DVR or NVR can not begin recording before formatting or initializing the Hard Disk Drive. The device continuously beeps since yet to the formatting the hard disk.
Step 7: Configure the network for remote monitoring
- Navigate to the network setting section, and choose the static IP address or DHCP based on your network configuration. But my recommendation is that you should enable DHCP, so the device gets the automatic IP address and goes online quickly.
- The final and last stage is to go to the Advance setting, click on Platform Access enable platform access and then put verification code/System encryption key two times for additional security and there you go your device is now online and ready to remote view from the Hik-Connect app.


Post a Comment